
Common Containers and Elements in a Blogger Template
Blogger Template Design: Tutorial 5
These common elements that I'll show are not necessarily the elements that exist or must exist in all Blogger templates, but are just some common elements that controls a large part of your template style. Knowing these elements will make it a lot easier for you to know where to look for in the template code and how to deal with other new elements that you may find in other templates.
I'm not going to list all the elements, but only enough elements so that you get the ideas and can understand all the other elements on your own. I will refer to the images from the below to CSS Styling Section make things easier to follow.

The symbols # and . show the attributes of the element (sort of a classification of the element type). But you don't have to worry much about this for now. If you want to know more about this, I suggest the W3Schools tutorials.
Global:
Header:

Main:
Technically, the Profile (About Me) container is placed inside a sidebar, but I'm putting it in the Miscellaneous section because there are many smaller elements that belong together with the Profile container and putting it in the Miscellaneous reduces the mess.

Post-Footer:
Read more...
- Tutorial 4: Setting the Properties of a Container
- Tutorial 6: Using the Generic Blogger Template
These common elements that I'll show are not necessarily the elements that exist or must exist in all Blogger templates, but are just some common elements that controls a large part of your template style. Knowing these elements will make it a lot easier for you to know where to look for in the template code and how to deal with other new elements that you may find in other templates.
I'm not going to list all the elements, but only enough elements so that you get the ideas and can understand all the other elements on your own. I will refer to the images from the below to CSS Styling Section make things easier to follow.

The symbols # and . show the attributes of the element (sort of a classification of the element type). But you don't have to worry much about this for now. If you want to know more about this, I suggest the W3Schools tutorials.
Global:
- body {.....} - general properties for the whole template.
- #outer-wrapper {.....} - the starting and largest container for all your template contents. Inside this is the header-wrapper, content-wrapper, and footer-wrapper.
- #content-wrapper {.....} - the wrapper that contains sidebars and main containers.
- a {.....} - this sets the overall properties of your link text.
- a:visited {.....} - this sets the overall properties of your visited link text.
- a:hover {.....} - this sets the overall properties of your link text when the mouse hovers over it.
Header:
- #header-wrapper - the container that wraps your Blog Title and Blog Description.
- #header - the container just inside the header-wrapper.
- #header h1 - the command inside this containers controls the appearance and layout of your Blog Title.
- #header h1 a - controls the properties of the Blog Title as a link text.
- #header .description - the properties of your Blog Description.
- #header a img - controls the properties of an image inside your header container.

Main:
- #main-wrapper - the container that wraps your Date Header, Blog Posts, Comments, Feed Link, and any widgets that you drag above or below the Blog Posts.
- #main - the container just inside the main-wrapper.
- #main .widget - controls the properties of all widgets inside the main container.
- h2.date-header - sets the properties of your Date Header (just above your Post Title).
- .post - sets the properties of your Blog Posts container.
- .post h3 - sets the properties of your Post Title.
- .post-body p - sets the properties of the body or content of your post.
- .post ul - sets the properties of an unordered list (a list that is not numbered).
- .post ol - controls the properties of an ordered list (a numbered list).
- .post li - controls the properties of the individual list inside an unordered list or an ordered list.
- a img - controls the general properties of an image (the a refers to a link; and an image is by itself a link).
- .sidebar-wrapper - the container that wraps all elements and contents in a sidebar.
- .sidebar - the container just inside the sidebar-wrapper.
- #sidebar1 - sets the properties inside sidebar1.
- #sidebar2 - sets the properties inside sidebar2. If you want the properties inside sidebar1 and sidebar2 to be the same, than you can just the properties inside .sidebar and don't have to even write down the #sidebar1 and #sidebar2 in your CSS code.
- .sidebar .widget - controls the properties of all the widgets (the Added Page Element) in your sidebar.
- #sidebar1 .widget - only sets the widgets in sidebar1.
- .sidebar .BlogArchive - sets the Blog Archive properties. Technically, this is a sidebar widget too, but I'm not sure why setting the properties for sidebar widgets doesn't change any properties for the Blog Archive. That's why I have to write down the .BlogArchive command to set its properties.
- .sidebar h2 - sets the title/header properties of a sidebar widget.
- .sidebar #BlogArchive1 h2 -sets the properties of the Blog Archive's title.
Technically, the Profile (About Me) container is placed inside a sidebar, but I'm putting it in the Miscellaneous section because there are many smaller elements that belong together with the Profile container and putting it in the Miscellaneous reduces the mess.
- #Profile1 - sets the properties for the About Me block.
- #Profile1 h2 - sets the title/header for the About Me block.
- .profile-img a img - sets the image in the About Me block.
- .profile-textblock - sets the author description About Me block.
- .profile-data - sets the author's data in the About Me block.
- .profile-datablock - sets the overall blocks of data in the About Me block.
- blockquote - sets the quoted text in your posts.
- code - sets the text contained within the code tags in your posts.

Post-Footer:
- .post-footer - sets the overall properties of the post-footer container.
- .post-footer-line - sets the properties for each new lines in the post-footer.
- .post-footer a - sets the link text properties inside the post-footer.
- .post-footer .post-comment-link a - sets the "comment" link inside the post-footer.
- #blog-pager - controls the properties of the "newer posts", "home", and "older posts" links.
- #blog-pager-newer-link - controls the properties of the "newer posts" link.
- #blog-pager-older-link - controls the properties of the "older posts" link.
- .feed-links - controls the "Subscribe to: Posts (Atom)" link.
- #comments - sets the overall comment container's properties.
- #comments a - sets the link text properties inside a comment container.
- #comments h4 - sets the header of the comment container.
- .deleted-comment - sets the properties of the deleted comment.
- .comment-author - sets the properties of the comment author.
- .comment-body p - sets the comment body properties.
- #comments ul - controls the unordered list inside a comment container.
- #comments li - controls the individual list inside a comment container.
- #footer-wrapper - the container that wraps all elements and contents inside a footer section.
- #footer - the container just inside the footer-wrapper.
- #footer h2 - sets the properties of the footer title/header.
- #footer .widget - controls the footer widget properties.
- .footer a - controls any footer link texts.
Labels: Make Template, Tutorial
Setting the Properties of a Container
Blogger Template Design: Tutorial 4
Here is a sample code for the 2 containers:

The #main and .post are the titles of each containers. Each container codes must be contained within {...}. For the explanation below, we'll focus on the codes inside the post block, especially for the explanation on the margin and padding (the codes colored in red).
Read more...
- Tutorial 3: The Structure of CSS Styling Section
- Tutorial 5: Common Containers and Elements in a Blogger Template
Here is a sample code for the 2 containers:
#main {
margin: 0px 0px 0px 0px;
padding: 0px 0px 0px 0px;
min-width: 400px;
max-width: 400px;
background: $mainbgColor;
color: #111111;
font: $textFont;
}

.post {
margin: 0px 20px 10px 0px;
padding: 10px 20px 10px 2px;
line-height: 1.5em;
text-align: left;
background: $postbgColor;
}
The #main and .post are the titles of each containers. Each container codes must be contained within {...}. For the explanation below, we'll focus on the codes inside the post block, especially for the explanation on the margin and padding (the codes colored in red).
- Margin - sets the distance between the border of the container to the border of a parent (larger) container outside it. There are 4 numbers defining the Margin property. The 1st number sets the top margin, the 2nd sets the right margin, the 3rd number sets the bottom margin, and the 4th number sets the left margin. It basically sets the whole margin in a clock-wise fashion starting from the top. In the case above, the parent container for the post container is the main container. See how the dashed border for the blue (post) container is placed inside the green (main) container following the post block's margin command (the codes in red). If the post's margins are all set to zero, then the post container would be exactly the same size as the main container. Think of the Margin as a command that moves its border away from a parent border. Another thing, Margin can have a negative value, which means that it moves toward the parent border and may overlap it (not away from it).
- Padding - sets the distance between the border of the container to the border of a child (smaller) container inside it. In the case of the post container, the child container is the post-body. The 4 numbers defining the padding sets the padding in a clock-wise fashion also, just like the Margin property. See how the post's padding puts the post-body inside the post container, away from the dashed border. Unlike the Margin, think of the Padding as a command that moves a child border away from its border. Padding values cannot be negative.
- Min-width and Max-width - sets the width of the container. Usually, it's enough to write it as width = 400px (for example), but it's becoming more of my habit to set the width as strict as possible, because I sometimes saw that if it's not written strictly, the container width might shrink and expand freely on some situations and in some different browsers. So by setting the width strictly, I made sure that it looks exactly like I want at all times in all browsers (basically getting rid of alignment bugs). If you look at my newer templates, I even set the width redundantly, say in Main-wrapper and then in Main containers eventhough they are pretty much the same. Doing it this way solves some alignment bugs that I saw (eventhough I don't really understand why it solves it by writing it redundantly).
- Background - sets the background color of the container. It uses the hexadecimal code for colors. See here for all the color values. You can also set a background image that repeats itself to cover the whole container block. The way to do this is by pointing to the URL of an image. For details on how to do this, see W3Schools tutorials. You can also set the value to be $samplevariable, where the variable is the one that you define in Subsection 1 in CSS Styling Structure.
- Color - sets the color of your text using the hexadecimal color code, or the variable defined earlier in Subsection 1.
- Font - sets the font of your text. You can use the variables set in Subsection 1 also. See W3Schools tutorials for more details on setting the font properties.
- Text-align - sets the alignment of your text. The 3 options are either left, center, or right.
- Line-height - sets the distance, or height, between two text lines.
Labels: Make Template, Tutorial
The structure of CSS Styling Section
Blogger Template Design: Tutorial 3
I've cut down the CSS Styling Section into 9 smaller subsections. For now, I'll describe the subsections in general. We'll get to the details on the coding inside these subsections later in the following tutorials. Always refer to the Structure of a Blogger Template to help you understand better the subsections and containers that I explain here.
Subsection 1 - Variable:
This subsection contains the declaration (the introduction) of the font and color variables that appear in the Fonts and Colors tab in the Layout page. For example, the Text Color or the Text Font variables that you can choose and modify using the Fonts and Colors tab. In my templates, I've added a lot of variables (close to 40+) compared to some of the standard Blogger templates to make it easy for you to customize a lot of things on the template.
Subsection 2 - Global:
This part contains the code to control the general appearance and layout. If you look at the green bar above, you'll see the code "body {.....}". This means that every code that goes inside the {.....} will control the general properties (size, layout, & appearance) of the body of the template (everything that the computer screen covers). For example, it controls the width of your whole template and the background color or image. But it doesn't control the detailed properties of the whole template (that is done by all the other subsections). Or, if you do set the detailed properties inside the body container, say the Text Font, and then reset the same properties inside a smaller sub-container, the properties set in the body container will be overridden, or canceled.
Inside this subsection, you will also find other important large containers - the Outer-wrapper and the Content-wrapper - so this subsection is where you want to look for if you want to tweak those containers.
Subsection 3 - Header:
This part controls the properties of everything inside your Header-wrapper container. The most common ones are the Blog Title and the Blog Description. In most of my templates, I've added an extra object in the Header-wrapper - the Linkbar (or the horizontal menubar). Typically, you can't add extra object in the Header because you can't use the Add Page Element tab. To add the Linkbar, I had to change the 3rd Section of the template code structure (which is the Data section). In my own blog (dzelque.blogspot.com), I added something else, which is the Google Search Bar. Ideally, you can add just about anything you want there, if you know how to deal with the 3rd Section. We'll get to this later.

Subsection 4 - Main:
This part controls the properties (size, layout, and appearance) of everything that the Main-wrapper block contains - the Date Header, the Post, the Comment, the Feed Link, and any widgets that you drag into the Main section using the Add Page Element tab.
Subsection 5 - Sidebar:
This part controls the properties of everything inside your Sidebar-wrapper - for example the Labels, Blog Archive, Adsense units, Link Lists, etc. But, it doesn't set how many sidebars you have or their locations on the blog (example Sidebar-Main-Sidebar or Main-Sidebar-Sidebar). That part is done in the Section 3 of the Blogger Template Code Structure- the Data Section.
Subsection 6 - Miscellaneous:
This part controls the properties of additional elements in your blog that's not controlled by all the above subsections. These elements are the Profile (or the About Me block), the Blogquote, and the Code. It means if you want to, say, change the color of the quoted text or the font of your nickname in the About Me block, this is where you want to look for to tweak it.

Subsection 7 - Post-Footer:
In my Generic Template, this part controls the properties of 3 things:
This part controls all the properties of the Comments section in your blog.
Subsection 9 - Footer:
This part controls all the properties in the Footer section. Generally, the Footer section contains some text explaining the ownership or copyright of a blog. In some other blogs, they also put extra stuff in the Footer section, like the Recent Posts or Popular Posts in 2 or more columns. Basically, you can just put about anything in the Footer as in the Sidebar. But if you want to add more than 1 column to your Footer, you have to tweak the 3rd section of your Blogger Template Code Structure.
Read more...
- Tutorial 2: The Structure of a Blogger Template Code
- Tutorial 4: Setting the Properties of a Container
I've cut down the CSS Styling Section into 9 smaller subsections. For now, I'll describe the subsections in general. We'll get to the details on the coding inside these subsections later in the following tutorials. Always refer to the Structure of a Blogger Template to help you understand better the subsections and containers that I explain here.

Subsection 1 - Variable:
This subsection contains the declaration (the introduction) of the font and color variables that appear in the Fonts and Colors tab in the Layout page. For example, the Text Color or the Text Font variables that you can choose and modify using the Fonts and Colors tab. In my templates, I've added a lot of variables (close to 40+) compared to some of the standard Blogger templates to make it easy for you to customize a lot of things on the template.
Subsection 2 - Global:
This part contains the code to control the general appearance and layout. If you look at the green bar above, you'll see the code "body {.....}". This means that every code that goes inside the {.....} will control the general properties (size, layout, & appearance) of the body of the template (everything that the computer screen covers). For example, it controls the width of your whole template and the background color or image. But it doesn't control the detailed properties of the whole template (that is done by all the other subsections). Or, if you do set the detailed properties inside the body container, say the Text Font, and then reset the same properties inside a smaller sub-container, the properties set in the body container will be overridden, or canceled.
Inside this subsection, you will also find other important large containers - the Outer-wrapper and the Content-wrapper - so this subsection is where you want to look for if you want to tweak those containers.
Subsection 3 - Header:
This part controls the properties of everything inside your Header-wrapper container. The most common ones are the Blog Title and the Blog Description. In most of my templates, I've added an extra object in the Header-wrapper - the Linkbar (or the horizontal menubar). Typically, you can't add extra object in the Header because you can't use the Add Page Element tab. To add the Linkbar, I had to change the 3rd Section of the template code structure (which is the Data section). In my own blog (dzelque.blogspot.com), I added something else, which is the Google Search Bar. Ideally, you can add just about anything you want there, if you know how to deal with the 3rd Section. We'll get to this later.

Subsection 4 - Main:
This part controls the properties (size, layout, and appearance) of everything that the Main-wrapper block contains - the Date Header, the Post, the Comment, the Feed Link, and any widgets that you drag into the Main section using the Add Page Element tab.
Subsection 5 - Sidebar:
This part controls the properties of everything inside your Sidebar-wrapper - for example the Labels, Blog Archive, Adsense units, Link Lists, etc. But, it doesn't set how many sidebars you have or their locations on the blog (example Sidebar-Main-Sidebar or Main-Sidebar-Sidebar). That part is done in the Section 3 of the Blogger Template Code Structure- the Data Section.
Subsection 6 - Miscellaneous:
This part controls the properties of additional elements in your blog that's not controlled by all the above subsections. These elements are the Profile (or the About Me block), the Blogquote, and the Code. It means if you want to, say, change the color of the quoted text or the font of your nickname in the About Me block, this is where you want to look for to tweak it.

Subsection 7 - Post-Footer:
In my Generic Template, this part controls the properties of 3 things:
- The Post-Footer - the texts below your post body. This is the part that contains information about your post, or the texts that say "Posted by YourNickname, Labels: ....., 5 Comments, etc.
- The Blog-Pager - the links at the bottom of your blog posts that say "Newer Posts, Home, or Older Posts".
- The Feed-Link - the link that says "Subscribe to: Posts (Atom)".
This part controls all the properties of the Comments section in your blog.
Subsection 9 - Footer:
This part controls all the properties in the Footer section. Generally, the Footer section contains some text explaining the ownership or copyright of a blog. In some other blogs, they also put extra stuff in the Footer section, like the Recent Posts or Popular Posts in 2 or more columns. Basically, you can just put about anything in the Footer as in the Sidebar. But if you want to add more than 1 column to your Footer, you have to tweak the 3rd section of your Blogger Template Code Structure.
Labels: Make Template, Tutorial
The structure of a Blogger template code
Blogger Template Design: Tutorial 2
Here's what the structure of a Blogger template code looks like, in a simple way of looking at it. I'm using my Generic Blogger template as a reference, but the idea is the same for other templates also. I've separated the code in 3 sections and show only the top lines of each section so you can look for the starting lines later on.
Section 1:
The 'header' of the code. Basically it contains important information about the template code and the title of your blog. Best of all, you don't have to worry about anything in this section. It's a standard header for all templates. The only time you add some codes here is when you want to put some meta tags (additional information about your blog for SEO).
Section 2:
This is the CSS Styling Section. CSS stands for Cascading Style Sheets, a web language used to control the style of a HTML document. This is the section that you want to know the most if you want to modify your existing template or design a new template. Eventhough it is a web programming code, you can still do a lot of things on you template design if you understand the structure of this section without knowing much about HTML and CSS. We'll get to this part in more detail later.
Section 3:
This is the Body or Data of the code - the most important part that fetches all your content from Blogger database and puts it in the right place into your blog when somebody is looking at your blog. This is also the section that tells your blog which part comes first - the Header, Sidebars, Main, Post, Footer, etc. But it doesn't set the appearance of the blog and how it would look like on the internet (because that part is controlled by the CSS styling section).
You basically don't have to worry much about this part too, just like the 1st Section. But you will have to know a little bit about this section if you want to start adding extra widgets that cannot be put using the Add Page Element button, like the social bookmarking buttons - Digg, AddThis, RSS buttons; or if you want to put Adsense codes in special places like in the Post Page; or putting Google Analytics code to track visitors to your blog; and many other things. Most of the time, there are easy instructions already available to help you add these things in your blog. So, again, nothing much to worry about in this section.
Read more...
- Tutorial 1: The Structure of a Blogger Template
- Tutorial 3: The Structure of CSS Styling Section
Here's what the structure of a Blogger template code looks like, in a simple way of looking at it. I'm using my Generic Blogger template as a reference, but the idea is the same for other templates also. I've separated the code in 3 sections and show only the top lines of each section so you can look for the starting lines later on.

Section 1:
The 'header' of the code. Basically it contains important information about the template code and the title of your blog. Best of all, you don't have to worry about anything in this section. It's a standard header for all templates. The only time you add some codes here is when you want to put some meta tags (additional information about your blog for SEO).
Section 2:
This is the CSS Styling Section. CSS stands for Cascading Style Sheets, a web language used to control the style of a HTML document. This is the section that you want to know the most if you want to modify your existing template or design a new template. Eventhough it is a web programming code, you can still do a lot of things on you template design if you understand the structure of this section without knowing much about HTML and CSS. We'll get to this part in more detail later.
Section 3:
This is the Body or Data of the code - the most important part that fetches all your content from Blogger database and puts it in the right place into your blog when somebody is looking at your blog. This is also the section that tells your blog which part comes first - the Header, Sidebars, Main, Post, Footer, etc. But it doesn't set the appearance of the blog and how it would look like on the internet (because that part is controlled by the CSS styling section).
You basically don't have to worry much about this part too, just like the 1st Section. But you will have to know a little bit about this section if you want to start adding extra widgets that cannot be put using the Add Page Element button, like the social bookmarking buttons - Digg, AddThis, RSS buttons; or if you want to put Adsense codes in special places like in the Post Page; or putting Google Analytics code to track visitors to your blog; and many other things. Most of the time, there are easy instructions already available to help you add these things in your blog. So, again, nothing much to worry about in this section.
Labels: Make Template, Tutorial
The structure of a Blogger template
Blogger Template Design: Tutorial 1
Before designing a template, you must have an idea of what the basic structure of a template is. Generally, the actual structure of any templates are not exactly the same. But, by knowing the basic structure, you can easily get the ideas of how to tweak your existing templates, design a template, and how to change it into a different structure.
Some parts of the template structure are obvious from what you can see on most blogs: the headers, footers, and posts sections. But there are some sections (I'll call these sections blocks or containers afterward) that are not visible on the computer screen, but important HTML-wise to build a practical and proper working template.
To start off, a template structure basically contains blocks of containers that looks like this: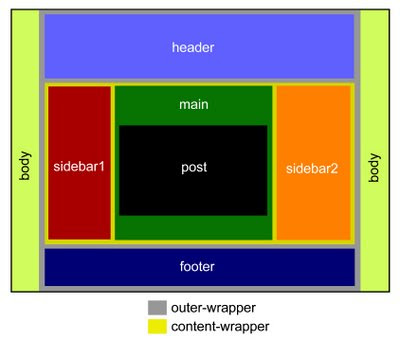
Going from the biggest to the smallest blocks:
Read more...
- Introduction: Tutorials on Blogger Template Design
- Tutorial 2: The Structure of a Blogger Template Code
Before designing a template, you must have an idea of what the basic structure of a template is. Generally, the actual structure of any templates are not exactly the same. But, by knowing the basic structure, you can easily get the ideas of how to tweak your existing templates, design a template, and how to change it into a different structure.
Some parts of the template structure are obvious from what you can see on most blogs: the headers, footers, and posts sections. But there are some sections (I'll call these sections blocks or containers afterward) that are not visible on the computer screen, but important HTML-wise to build a practical and proper working template.
To start off, a template structure basically contains blocks of containers that looks like this:

Going from the biggest to the smallest blocks:
- Body: the outer most block is the Body of your template (basically everything that the computer screen covers).
- Outer-wrapper: this container covers your whole template (the body is more like the outside of your template). In general, you build a wrapper to place a multiple of smaller blocks inside it. The most common blocks inside this Outer-wrapper is the Header, Content, and Footer.
- Header: this block is the top most part of your blog (the name is quite obvious). But inside the Header you will have other sub-blocks too - the Header Title block, the Header Description block, and others such as the Adsense banners, a menu bar, etc. So, to wrap all these sub-blocks inside one large container, the largest container in the Header section is usually a Header-wrapper that wraps everything inside.
- Content: below the Header is the Content-wrapper - basically the most important container block of all. Immediately inside this wrapper are the Sidebar containers (1,2 or any number of sidebars) and the Main container (which contains your posts, comments, or some ads).
- Footer: is the bottom most container of your template. As in the Header section, you'll also need a Footer-wrapper to contain other sub-blocks in the Footer section.
- Main: the Main-wrapper is the outer most container in the Main section which goes inside the Content-wrapper. Inside this Main-wrapper are the Post block, Comment block, Date Header, and other widgets created from the Add Page Element option.
- Sidebar: is the block that contains all your side widgets - About Me, Labels, Archive, Text, HTML, Adsense, etc. In a standard Blogger template, you will usually find only 1 sidebar - hence the 2-column template (Main and Sidebar). But it's actually easy to add multiple number of sidebars. The most common ones are 2 sidebars - or the 3-column template. You will see from these tutorial series that once you understand the template structure, it's actually easy to add and move the sidebars to the left or right of your Main container.
- Blog Post: this block contains the important stuff - your Posts Titles, Post, Post Author, Labels, etc.
- Body
- Outer-wrapper
- Header-wrapper
- Blog Title
- Blog Description
- Other widgets
- Content-wrapper
- Sidebar-wrapper (1,2,3...)
- Main-wrapper
- Date Header
- Posts
- Post Title
- Post Content (or called Post Body)
- Post Footer (Author, Labels, etc)
- Comments
- Feed Link
- Other widgets (mostly ad units)
- Footer-wrapper
- Footer text (disclaimer, copyrights, etc)
- Other widgets
Labels: Make Template, Tutorial